준비물
ECG-UNO.1. 아두이노 우노 - 아두이노 통합 개발 환경 Arduino UNO - Arduino Desktop IDE
목표 아두이노로 심전도를 측정 기록하고 심박수를 계산해서 심박수가 일정 수 이상 증가하거나 감소할 때 일정 주파수의 음(소리)를 발생시키려고 한다. 공부 아두이노 공식 사이트 https://ardui
artnam.tistory.com
- 빵판 breadboard
- 신호발생기 function generator
- 점퍼선 jumper wire
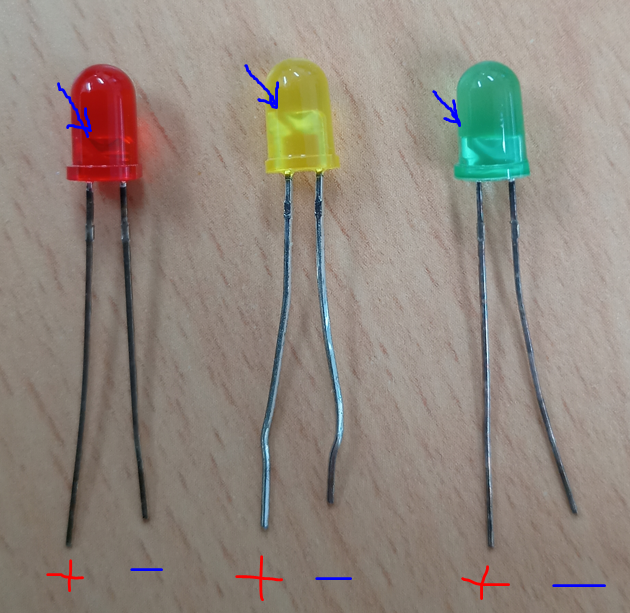
- LED
- 저항 resistor
- 참고자료: PulseSensorPlayground (여기서부터 '피에스피'라 함)

절차
피에스피 https://github.com/WorldFamousElectronics/PulseSensorPlayground로 가서 Loading the Playground Steps for Loading the Playground in Arduino 클릭하면 프로그램 설치하는 설명이 나온다. 간략하게 보면 다음과 같다.

- 아두이노 IDE에서, '스케치, 라이브러리 포함하기, 라이브러리 관리...'


- 설치한 이후에는 '파일, 예제, PulseSensor Playground'에서 여러가지 스케치를 열어 테스트 해 볼 수 있다.

I. 펄스 신호 받아서 일정 레벨 이상이 되면 LED 반짝이게 하기
목표:
센서(여기서는 신호발생기를 사용)의 출력을 아두이노 보드에 연결하고 아두이노 보드의 출력을 LED에 연결하여 맥박에 따라 LED가 반짝이게 한다.
절차:
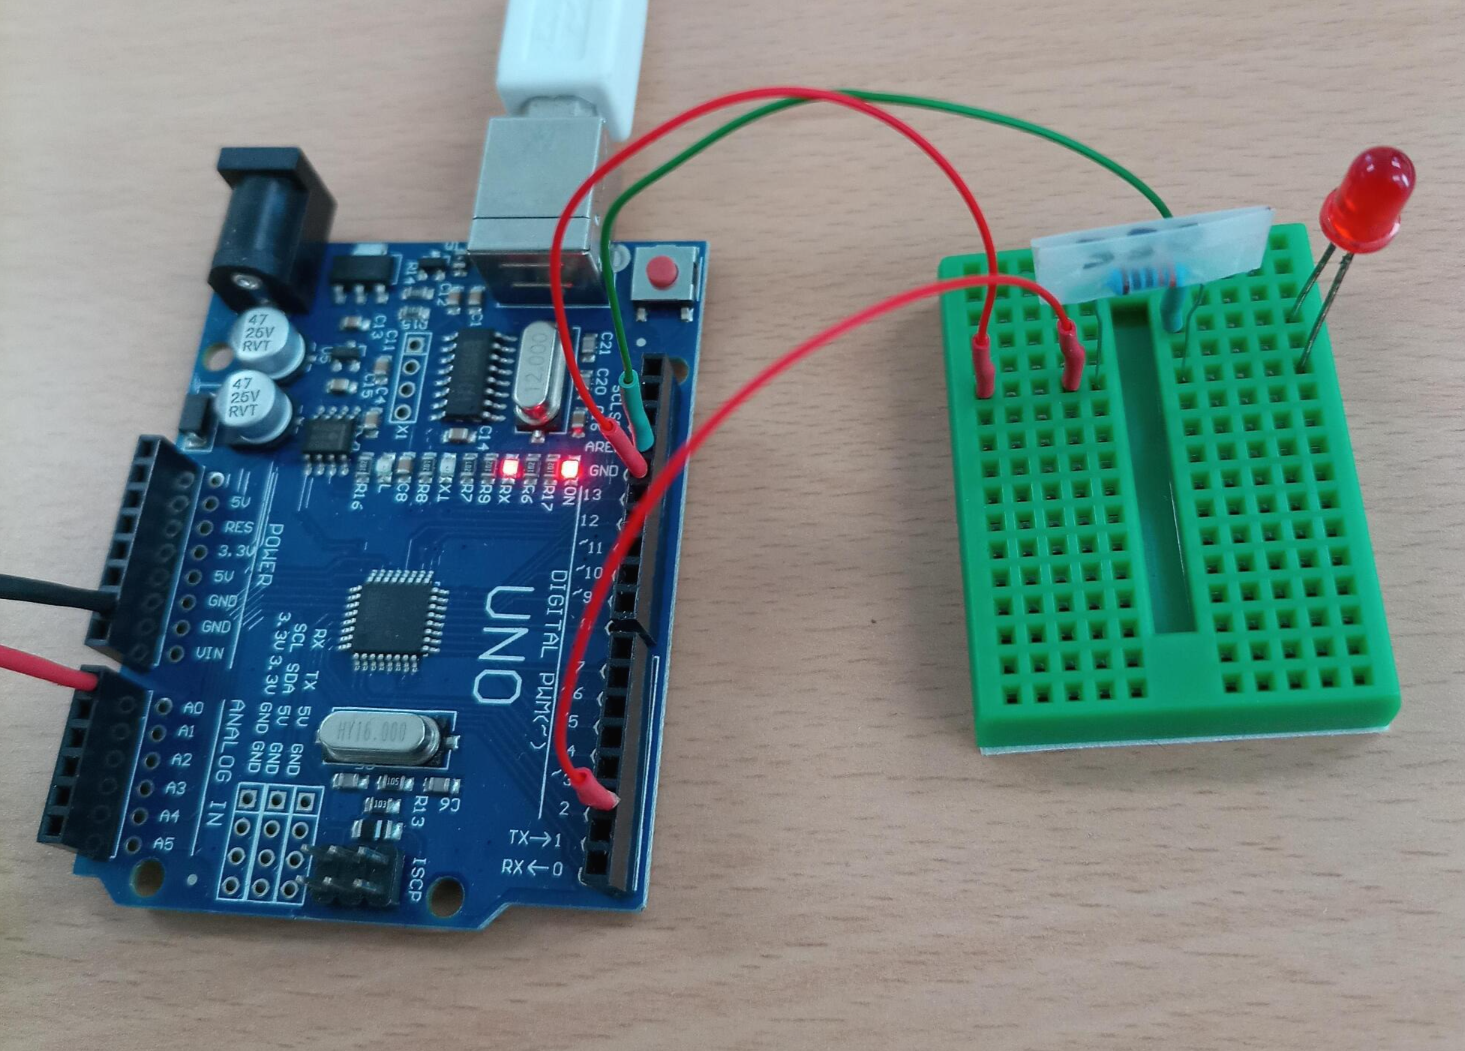
1. 선연결 wiring

2. 스케치 'GettingStartedProject' 열고 보드에 업로드하여 실행시키기: ''파일, 예제, PulseSensor Playground,GettingStartedProject'.
LED가 반짝이지 않으면 'Threshold' 값을 펄스를 잘 구분할 수 있는 수준으로 변경한다.

결과물:

II. 펄스 신호로부터 횟수 계산하기 pulse counter
목표:
센서(여기서는 신호발생기를 사용)의 출력을 아두이노 보드에 연결하고 아두이노 보드의 출력을 LED에 연결하여 맥박에 따라 LED가 반짝이게 함과 동시에 맥박수를 계산하여 출력한다.
절차:
1. 선연결 wiring
D13-빵판-저항-LED 중에서 빵판-저항 사이에 점퍼선 한쪽 핀을 꽂고 D2에 다른 쪽 핀을 꽂는다 (저항과 LED 사이에 한쪽 핀을 꽂으면 안됨. D13에서 저항을 통과하면서 전압 하락 voltage drop이 일어나서 Threshold에 도달하지 못하기 때문).
2. 스케치 - 두 개의 소스를 참고하여 만듦
- PulseSensor Playground,GettingStartedProject
- https://circuits4you.com/2016/05/13/arduino-frequency-counter/
// PulseCounter_mine.ino

// source: 'PulseSensor Playground,GettingStartedProject'
int PulseSensorPurplePin = 0;        // Pulse Sensor PURPLE WIRE connected to ANALOG PIN 0
int LED13 = 13;   //  The on-board Arduion LED

int Signal;                // holds the incoming raw data. Signal value can range from 0-1024
int Threshold = 150;   // LED가 반짝이지 않으면 신호를 중간에 끊을 수 있게 역치 threshold를 조정
int delayTime = 10; // millisecond

// source: https://circuits4you.com/2016/05/13/arduino-frequency-counter/
int IN2 = 2; // digital-in 2 as input

#define MainPeriod 1000  // millisecond

long previousMillis = 0; // will store last time of the cycle end
volatile unsigned long duration=0; // accumulates pulse width
volatile unsigned int pulsecount=0;
volatile unsigned long previousMicros=0;


void setup() {
  // put your setup code here, to run once:
  pinMode(LED13,OUTPUT);         // pin that will blink to your heartbeat!

  Serial.begin(9600);
  pinMode(IN2, INPUT);
  attachInterrupt(0, myinthandler, RISING); // IRQ 0 match to digita-in 2
}


void loop()
{

  // signal display.begin

  Signal = analogRead(PulseSensorPurplePin);  // Read the PulseSensor's value.
                                              // Assign this value to the "Signal" variable.

  Serial.println(Signal);                    // Send the Signal value to Serial Plotter.


  if(Signal > Threshold){                          // If the signal is above "550", then "turn-on" Arduino's on-Board LED.
    digitalWrite(LED13,HIGH);
    } else {
    digitalWrite(LED13,LOW);                //  Else, the sigal must be below "550", so "turn-off" this LED.
  }

  delay(delayTime);

  // frequency measure.begin
  unsigned long currentMillis = millis();

  if (currentMillis - previousMillis >= MainPeriod)
  {
    previousMillis = currentMillis;
    // need to bufferize to avoid glitches
    unsigned long _duration = duration;
    unsigned long _pulsecount = pulsecount;
    duration = 0; // clear counters
    pulsecount = 0;
    float Freq = 1e6 / float(_duration);    //Duration is in uSecond so it is 1e6 / T

    Freq *= _pulsecount; // calculate F
    // output time and frequency data to RS232
    Serial.print("Frequency: ");
    Serial.println(Freq);
    Serial.println("Hz");
  }
}

void myinthandler() // interrupt handler
{
  unsigned long currentMicros = micros();
  duration += currentMicros - previousMicros;
  previousMicros = currentMicros;
  pulsecount++;
}
3. 결과물


'Arduino.ECG' 카테고리의 다른 글
| ECG.UNO.2. 아두이노로 전압측정하기 (0) | 2021.10.11 |
|---|---|
| ECG-UNO.1. 아두이노 우노 - 아두이노 통합 개발 환경 Arduino UNO - Arduino Desktop IDE (0) | 2021.10.07 |


댓글